
Reference Photography Techniques
Hints on
taking photos for use in replica modelmaking.
Reference Photography Techniques
Hints on
taking photos for use in replica modelmaking.
|
We've all taken loads of pictures and reference shots of our favourite subjects so that it helps us build a model of it, however, there is more to building a model than just details. You also need the kind of reference necessary to determine correct proportion and dimensions of your subject as well if you want to make your model as accurate as possible, especially if you are scratch building. The main thing I want to concentrate on here is photographing the object you want to replicate so that we can determine accurate physical proportions. This includes more accurate delineation of height, width, and length of the original in relation to each other as well as profile shapes such as curves and angles. We've all seen blueprints that show top views, side views and front and rear views and so on drawn in what is known as "orthographic" representation. This is a view that ignores the perspective distortion we see in real life objects. Because it's often impossible or impractical to physically measure a subject in person (perhaps the subject is encased within a glass display), or too difficult to measure some details, complex curves and angles etc., we need photographic reference that will give us a translated two-D representation of that 3-D object.... In other words, we will use a photograph, or series of photographs, in place of, or in preparation of, an orthographic blueprint. For such photography it is best to have a camera mounted to an adjustable tripod for maximum stability and in a fixed location so the shot can be better planned. Time exposures may also be necessary, and an SLR camera (Single Lens Reflex, where what you see in the viewfinder is what the camera's lens sees) is most beneficial. The worst cameras to use are those which the viewfinder is offset from the photographing lens. The first thing we need to understand is that proportional accuracy is best achieved by "right-angle" shots of the surface we want to replicate. In the case of a subject with multiple surfaces or facets, multiple shots may be necessary. Observe the example below. Note what I refer to as the "picture plane" is represented by the dotted rectangular box. Think of this as the piece of paper your blueprint is drawn on. 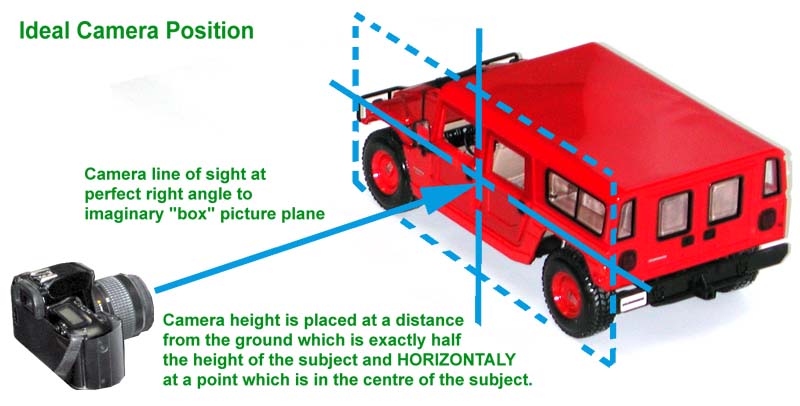 Here I show a typical simple setup to give an idea of the camera's position relative to the subject, in this case a 1/16th scale model of a Humvee, although this technique works for any size subject. Note: if the subject is displayed at an angle with reference to the ground, you will need to adjust your camera position so that it is at a 90 degree angle to the SUBJECT's side rather than the subject's surroundings! Now, in the case of a very long subject, you can just pick points along it's length to take a series of these shots, rather than just one shot in the centre. It's important that you maintain an as-close-to exact perpendicular angle to the side of the subject so that proportions are accurately portrayed. Next, let's deal with distance. Most cameras today have zoom, or telephoto lenses that allow you to get closer to an object that is far away. Try to use this to your advantage whenever possible. In fact, the best way to photograph a subject and get the best possible proportion is to use your camera at full telephoto and then back away from the subject until it fills your screen. If you have an SLR and a separate telephoto lens, that's even better. Depending on the size of your object, like a full size car or aircraft, you may have to move hundreds of feet away from the object for maximum effect. Doing this helps minimize a distortion of perspective known as "Parallax Error" which is most detrimental to discerning proportional accuracy. Use optical zoom only, do not cross into the "digital zoom" territory or you will just lose image quality. Here's an illustration of the technique and it's effects below, note that the distances illustrated in all the diagrams on this page are not shown to scale. 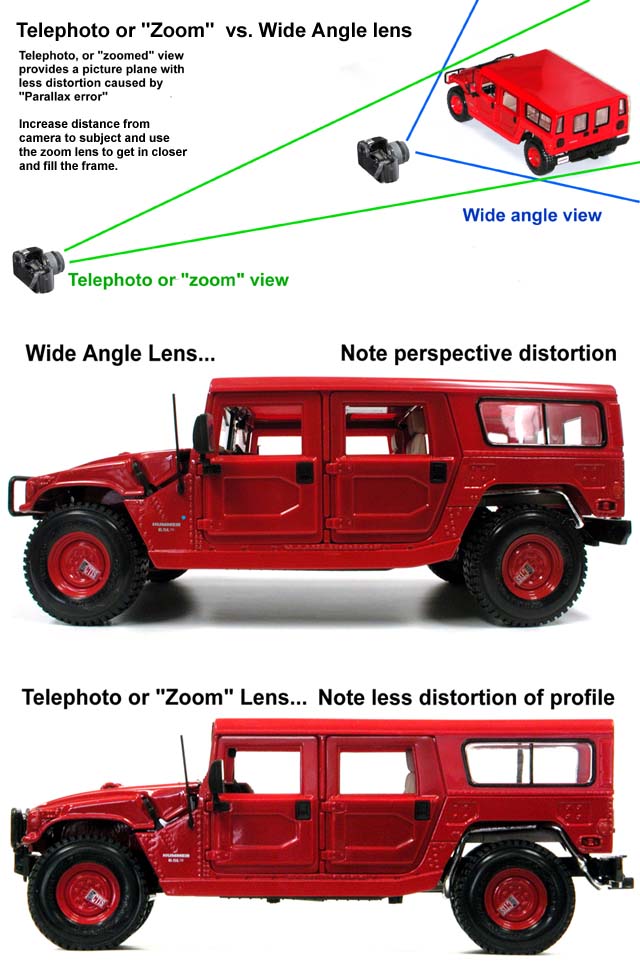 Look quickly between the two side profile images above and compare them. As you can see, by backing away from the subject and using the zoom feature of your camera to THEN close in optically, you will achieve much more "blueprint-like" image which is much easier to gauge proportion. In the telephoto image, the roof line of the vehicle is straight as it should be, not curved as in the wide angle view. The tires are closer to perfect circles in the telephoto view and not elliptical, and the rear of the vehicle looks straight up-and-down as it should be, not curved or distorted. One can easily imagine that if the wide angle view of the model were used instead of the zoomed view, the resulting replica would be far less accurate! Again, note that in both shots, the camera was positioned exactly perpendicular to the subject, making it much easier to determine correct proportional accuracy of the entire subject. Now, it's not perfect, but if you have the room to do so, and your camera is capable of it, get WAY back and use a long telephoto lens and it would be possible to eliminate such a tremendous amount of Parallax error you could almost trace the exact profile of the subject and easily achieve an extremely high degree of proportional accuracy! Rule of thumb... the farther away from the subject you can get, the less parallax error is evident. Now, here's a problem you may encounter, and for this you will need a good solid tripod and a camera with the ability to take a time exposure. As mentioned above, many of the subjects you'll want to take pictures of will be behind a glass case. If this is the case (sorry for the pun) you will want to mount your camera to a solid tripod and take a time exposure shot using existing lighting, as the glass case may reflect the camera's flashbulb and blind the shot. Use the camera's timer function to shoot so that you don't have to touch the camera during exposure, as this may cause movement, blurring the picture. If you're using a digital camera (I think most people are nowadays) try shooting with the flash too (you can always erase bad shots), and see how it turns out. It just might work if the glass is NOT perpendicular to your line of sight. If you're worried about details not showing up as you'd like during these shots, don't worry, you can take all those detail shots the "normal" way too. For the shots I'm writing about here, we're mainly concerned with proportional and profile accuracy. Next, lets look at how to shoot smaller details... Observe the picture below: 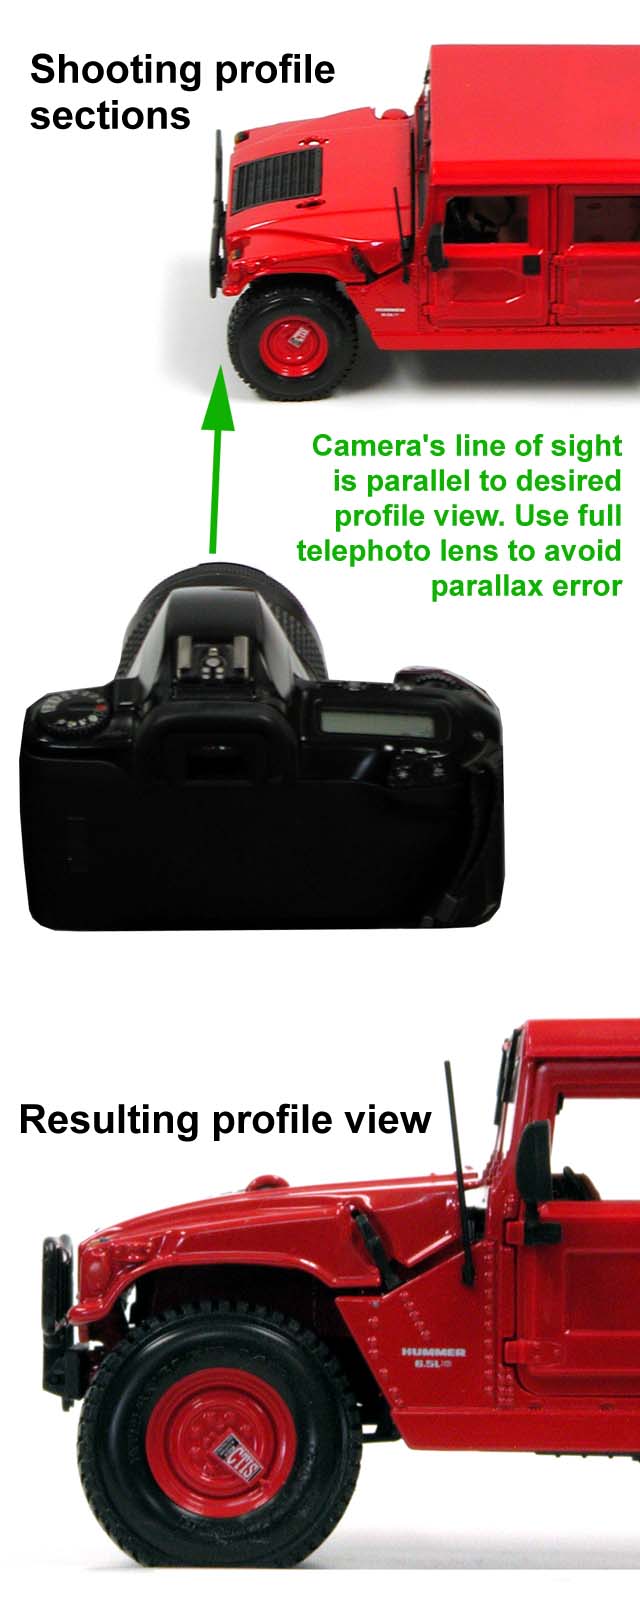 This technique can be employed for sections of a subject, when more detailed photography is used. Remember, when shooting along angles, take care to always make sure you are perpendicular to the front surface picture plane. Line of sight is always as if sighting along the barrel of a gun over the apex of the angle. A slight tilt from perpendicular will distort the image therefore making interpretation difficult. Try to understand how a blueprint is drawn, and try to achieve that kind of shot within the camera. Remember, always shoot straight on, don't tilt the camera to look at a detail. Use a different shot for that if you want. Always try to think in "two dimensions" to reduce parallax error. Another thing you can do, if you are able to interact with the subject if it is accessible, is to place rulers and/or T-squares on the imaginary picture plane so that you can use them as a guide for size relationships of details. You can also make some measuring sticks which you have prepared by making alternating black-and-white marks every inch (or other standard measurement) along the stick to make them more visible. Make sure your rulers are always exactly perpendicular to your camera's line of sight. Only a few degrees off will distort the length of the measuring device, and give you a "false reading". Careful and planned set up when possible will yield the best results. I hope this little article has helped you to understand some of the basics of reference photography. If you use these techniques, you will find them most useful in the creation of your replica of the subject you are photographing. If you have anything to add to this or if you have a question, please drop me a line at "jim@smallartworks.ca" and place in the title bar of the email , "Photo Reference Article". Thanks! EjIMBo. |